Sunday, March 27, 2016

Kökudiskur/standur - Cake stand DIY

Gledilega páska, tad er ansi langt sídan ég gerdi færslu, en tad er búid ad vera frekar mikid ad gera hjá mér og ég er ekki búin ad geta sinnt blogginu eda ödrum áhugamálum upp á sídkastid. Mig langar ad deila med ykkur smá DIY sem ég gerdi um daginn, en ég föndradi kökustand úr disk og kertastjaka sem ég átti og tad kom bara ótrúlega vel út. 
...........................
Long time since I blogged, I have been really busy with school and work lately so I have not been able to blog. I wanted to share with you a little DIY that I did the other day, but I made a cake stand, using a cheap plate from Ikea and a candle holder from H&M-Home. 


Diskinn keypti ég í IKEA á 100 kr og kertastjakann fékk ég á útsölu í H&M Home á litlar 400 kr. 
Ég keypti nokkra kertastjaka á útsölunni tví mér fannst teir svo sætir en ég keypti bara einn í bleiku og fannst hann aldrei passa inn med hinu skrautinu mínu. Svo datt mér allt í einu í hug ad nota hann sem stand fyrir kökudisk og ég er bara rosalega sátt med útkomuna. 


Ég gerdi tetta í svolitlu flýti og notadi bara límbyssu til ad líma diskinn vid kertastjakann en ég veit ekkert hvad tetta mun haldast lengi. Hann hangir enn saman og ég er búin ad nota hann nokkrum sinnum og tríf hann bara varlega í höndunum eftir notkun. Svona kökustand má nota fyrir ýmislegt annad en ad bera fram kökur en ég hef séd margar hugmyndir eins og t.d. standur fyrir snyrtivörur, armbönd og úr, naglalökk, ilmvötn eda sem skreytingu og setja t.d. kerti á hann. 
........................
I just used a glue gun to glue together the plate and the candle holder and it still holds, although you can probably find some better ideas to glue this together. I just wash it carefully by hand. A cake stand can be used in many other ways than just to serve a cake for example to store your favorite make-up, store jewelry, sun glasses, nail polish or as a decoration with candles.  
 Skartgripir og sólgleraugu.
Jewelry and sunglasses. 
Páskaskreyting
Easter decoration 

 Uppáhalds/mest notadar snyrtivörur
Favorite/most used make-up
Naglalökk
Nail polishes 

Hárskraut og skart 
Hair accessories and jewelry

Rosaleg Oreo-kaka
Amazing Oreo cake.


Friday, March 11, 2016

Púdar, púdar, púdar...Pillows, pillows, pillows.

Jæja loksins loksins get ég sest nidur og skrifad eitt stykki blogg. Ég er eitthvad vodalega skotin í allskonar púdum tessa dagana, hringlaga/hringlóttum púdum, saumudum, hekludum, einföldum og munstrudum. Ég hef verid ad dunda mér vid ad gera smá breytingar í stofunni minni og hef tví verid ad safna ad mér hugmyndum og skoda allskonar púda og skraut. Í sídustu færslu skrifadi ég um stofuna og stílinn sem ég vildi halda mér vid, en tar eru einnig innblástursmyndir frá pinterestinu. 
Ég elska púda og ég fæ aldrei nóg af púdum inn á heimilid, mér finnst teir gera svo mikid og bara vera eitthvad svo kósý. 
Trátt fyrir ad vilja hafa ákvedin stíl á heimilinu, reyna ad láta allt líta ágætlega út, tá finnst mér mikilvægast ad vera í tæginlegu umhverfi tegar ég er heima hjá mér. Tad tarf allt ad vera svolítid kósý og notalegt til ad mér lídi vel. 
Ég bjó til einn hringlaga prjónadann púda alveg fyrir slysni um daginn og mig langadi ad deila med ykkur hugmyndinni tví hann var svo ótrúlega einfaldur.
Ég var búin ad fytja upp 100 lykkjur rúmlega, med gródu garni á hringprjón nr. 5 og ætladi ad prjóna peysu. Tetta var gamalt uppfit og ég mundi ekki alveg hvad ég ætladi ad gera úr tessum hólk sem var búinn ad myndast. Ég var svo búin ad skoda myndir af hringlaga púdum og datt í hug ad prófa bara ad loka fyrir og draga saman hólkinn í sitthvorum endanum og teygja hann utan um hringlaga púda. 
................................
I have been falling in love with round cushions lately. After i decided to change things in my living room i have found so many inspirational photos and got so many ideas. I love all kinds of cushions, round, knitted, crochet, simple, with patterns...all of them. The most important thing though is that they are comfortable. I like the idea of having a simple, and good looking home, but for me a home needs to be a place where you feel comfortable and i need my surroundings to be cozy. That is why i love having pillows around everywhere and I never get enough of them. 
I accidentally made a knitted round pillow the other day, and it was so simple and easy to make that I wanted to share it. I made around 100 loops on a circular needle, and knitted in circle until I had a "tube". Then i stitched together and pulled through in the middle on both sides and put a round pillow inside. 

Tetta kom svo vel út, bara einfalt slétt prjón í hring, prjónadur hólkur og svo tekinn saman sitthvorum megin. 
Púdafyllinguna bjó ég svo til á örskamma stundu, en ég tók myndir til ad sýna hversu einfalt tad var. Í fyllingu nota ég alltaf ódýru litlu púdana úr IKEA. Í tetta sinn notadi ég einn og hálfann púda til ad fylla tennan stóra hringpúda, en hann er 20'' í tvermál.
.............................
This really came out well, just stocking stitch, knit a tube and than pull through, in the center. I made the filling myself, that way i self choose the size of my pillow and it is just easier. I always use the cheap little pillows from IKEA and for this one i used 1 and 1/2 pillow to fill up. 


Mér fannst eitthvad vanta í lokaútkomuna svo ég ákvad ad prófa ad setja tölu í midjuna. Ég átti enga nógu stóra sem passadi vel vid, en ákvad ad prófa ad búa til úr DIY tölu kitti, sem ég keypti fyrir löngu í Tiger. Tetta var ótrúlega einfalt og ég hlakka til ad föndra fleiri tölur.
.........................
I thought the final outcome needed something extra so I used my old button-diy-kit from Tiger to create a little button to put in the center of the pillow. 


Nú get ég snúid honum á báda vegu, hann er med tölu ödru megin og svo engu hinum megin.

Hér eru svo nokkrar fleiri hugmyndir og uppskriftir af fleiri hringlaga púdum. 
.................
Here are some ideas and patterns for more round cushions. 

Blómapúdinn fallegi, blog hér. 
Retro style púdi væri fallegur í fölgráum litum eda fallegum fölum pastel litum. 

Tessi er líka algjört ædi, fullkominn í svefnherbergid, á sófann eda í barnaherbergi.


Friday, March 4, 2016

Pinterest innblástur - Pinterest inspiration

Eins og ég taladi um fyrir stuttu sídan, tá hef ég verid í sá vandrædum med stofuna mína og hvernig ég vil hafa hana. Nú er ég smátt og smátt ad reyna ad komast ad nidurstödu og langadi mig tví ad deila med ykkur innblæstri mínum frá Pinterest. Ég er mjög hrifin af skandínavíska stílnum, líklegast tví ég bý í Danmörku núna og er tessi stílhreini einfaldi stíll mikid í gangi hér í Kaupmannahöfn. Ég er nokkurn vegin búin ad ákveda hvada liti ég ætla ad halda mér vid. Hvítt, svart, grátt og gyllt. Svo eru húsgögnin mín í ljósum vidarlit. 
Hér koma nokkrar myndir frá Pinterest. 

........................

I have been trying to redecorate my living room for a while now, but i can´t seem to find a solution and decide how i want it to look like. I really like the scandinavian style, although I am normally in to antik and brown beige colors. But it is probably because I live in Denmark now and everywhere you go you see this simple plain scandinavian style in house decoration. 
I have decided to keep to the colors black and white, whit grey and gold, and my furniture is in light wooden style. Here are some inspirational pictures from pinterest. 
I will post a blog soon with before and after pictures of my living room.


Á morgun ætla ég svo ad skella inn bloggi med fyrir og eftir myndum af stofunni minni :) 

Saturday, February 20, 2016

DIY Skraut-sería - Decorative lights


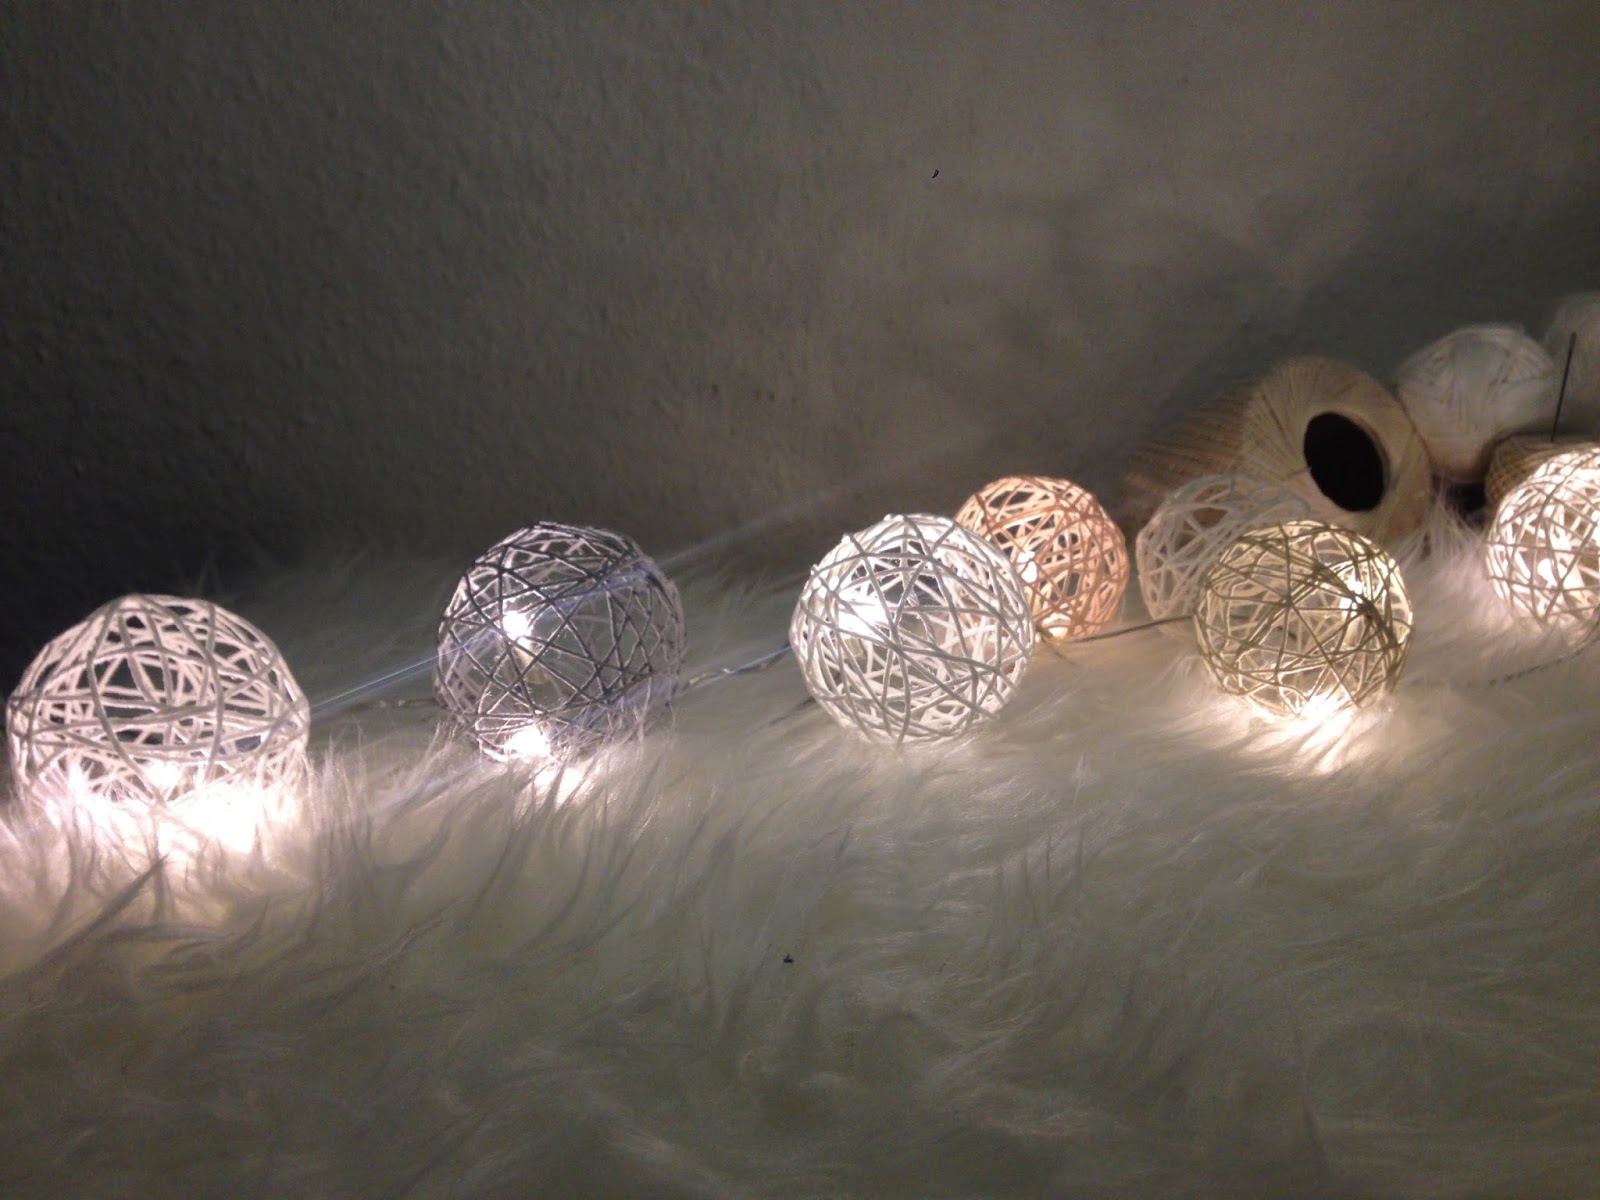
Ég er algjört jólabarn og mér finnst ótrúlega gaman ad föndra og dúlla mér sérstaklega í kringum jólahátídirnar. Ég fann fallega útfærslu á jólakúlum eda "snjóboltum" á pinterest (kemur á óvart..) en ég ákvad ad búa til skraut-ljósaseríu úr boltunum í stadinn fyrir jólaskraut. 
Kúlurnar er hægt ad gera á mismunandi vegu, en eins og ég gerdi med heklada kúluljósid, tá tarf ad stífa garnid. Ad tessu sinni átti ég veggfódurslím, frá ödru verkefni sem ég set inn sídar, en ég vildi nýta afganginn og ákvad tví ad purfa ad stífa med tví. 
Veggfódurslímid var í duftformi, svo tad tarf bara ad blanda vatni saman vid og tú rædur tví nokkurnveginn tykktinni. Límid geymist í sirka 10 daga eftir blöndun svo tad er hægt ad gera ýmislegt ef tid eigid afgang. Ég mæli med pinterest ef hugmyndaflugid er ekki nógu öflugt. 
........................
I love Christmas and I really enjoy the time around the Christmas holidays, I love crafting and making my own decorations and this year I found a beautiful version of Christmas ornaments, "Snow-balls" which I decided to change into an all-year-round home decoration lighting. 
You can make these in different ways, but as I did with my crochet light, you need to stiffen the yarn. I had some leftover wallpaper glue that I wanted to use, so I tried that for now, and it worked amazingly. Wallpaper glue is often in a powder form, that you blend with water and it holds for about 10 days. You can do different things with wall-paper glue, so if you have leftovers i recommend Pinterest to check on ideas. 
 :
(myndir af upprunalegu hugmyndinni/ photo tutorial from the original idea)

Ég notadi/ I used: 
-Bómullargarn/Cotton yarn: Søstrene Grene 
-Veggfódurslím/Wallpaper glue: Bauhaus
-Vatnsblödrur/Water balloons: Tiger
-Glær LED-sería/Led lights: IKEA/Gardheimar/A4

Ég ákvad ad nota nokkra liti í mína seríu, tví mig langadi ekki ad hafa hana alveg hvíta. Ég er mjög hrifin af gráu og bleiku saman, og notadi tví fölbleikan og ljósgráan, ásamt hvítum og kremudum lit. Útkoman var ædi og ég er ekkert smá sátt.
...............................
I used a few colors in mine, because i didnt want it to be all white. I love grey and pink together, so I used pale pink and light grey, with some white and beige color. The result is beautiful and I am so happy. 

Adferd:
Adferdin er audveld, og útskýrist svolítid á myndunum fyrir ofan. Byrjid á ad finna til límid, garnid, skæri og blása upp vatnsblödrur. Ég sirkadi út lengd á bandi fyrst fyrir eina kúlu, og klippti svo nokkra eins í mismunandi litum sem voru tá tilbúnir fyrir næstu blödrur. Gott er ad nota einnota plasthanska vid tetta verkefni, en ef notad er veggfódurslím, tá er tad audtrifanlegt med sápu. Ég bleytti vel upp í hverjum spotta og dró hann svo jafnódum upp úr límdollunni og vafdi óreglulega utan um blödruna, passa ad tad sé frekar tétt, og ekki of stór göt inn á milli. Svo lagdi ég allar blödrurnar í gamlan skókassa, snidugt ad hafa bökunarpappír í botninum á kassanum (dagblöd geta litad frá sér tegar límid er blautt). Til ad flýta fyrir turrkinum er svo alveg hægt ad blása á kúlurnar med hárblásara. Ég er yfirleitt mjög ótolinmód, en leyfdi kúlunum tó ad torna yfir nótt og passadi mig ad fara varlega tegar ég losadi frá blödrunni. Tad er hægt ad sjá hvort tær séu tilbúnar med tví ad pressa adeins á blödruna í gegnum eitt gatid, og ef hún losnar frá med smá brakhljódi, tá ætti ad vera óhætt ad sprengja og losa varlega frá. 


 How to:
It is pretty simple, as you can see on the photo-tutorial above. Start by preparing the glue, the yarn, scissors, and blow up the water-balloons. I cut the yarn in to pieces, c.a. 2-3 m. It is good to use disposable plastic gloves for this task, but if you use wallpaper-glue, it comes of really easy with just water and soap. I soaked each peace of yarn in the glue and then I continuously pulled it out of the glue-tray and irregularly wrapped around the balloons. Try to wrap it rather tightly around so it wont make too big gaps in between. After i wrapped around each balloon, I put them into an old shoe box, a good tip is to put baking paper in the bottom of the box, to prevent the balloons from sticking to the paper box (newspapers can emit color, when the glue is still wet). To accelerate the drying part it is possible to blow on the balls with a hairdryer. I am usually very impatient, but now I let the balloons stay drying over night, and was extra careful when I removed the balloons from the yarn. To see if they are ready and dry enough, you can press lightli on the balloon, and if it makes a cracking sound when it releases from the yarn it should be ready.


Ég notadi 20 ljósa seríu, og setti tvær perur saman í hverja kúlu/bolta, ég hafdi engin sérstök göt fyrir seríuna heldur fann ég bara hentugt gat einhversstadar til at stinga seríunni í. 
.........................
I used LED-lights with 20 lights and made 10 balls so I put 2 lights in each ball, I did not make special gaps for the lights, i just found a gap/s that fitted. 


Thursday, February 18, 2016

Kúluljós - Crochet light


Eftir jólin 2014, í janúar tegar ég turfti ad taka nidur jólaskrautid, fannst mér vanta lýsingu i stofuna. Ég hafdi verid med stóra jólastjörnu hangandi í einu horninu og tad vantadi eitthvad eftir ad ég tók hana nidur. Ég hafdi séd fullt af fallegum ljósum á pinterest. 
.........................
In january 2014, when I took my christmas decorations down, i wanted more lighting in my living room. I had seen many beautiful crochet light bulbs on Pinterest so i decided to try and make one self.
Crochet Lampshade  Gray by babytogo on Etsy, $67.00: Gorgeous!!!!!!! Hand-made light made with doilies and a lighting kit from IKEA for only $12! I figure it's worth a try for that price.:

Lamps by sharonsparkles:

Ég hafdi fengid í jólagjöf frá langömmu minni, helling af fínu garni og fíngerdum heklunálum, svo ég ákvad ad núna gæti ég prófad mig áfram ad hekla úr tessu fína og athuga hvernig tad kæmi út sem ljós. 
Á einni viku vard ljósid til, ég stífadi tad svo med vatni og sykri, tví engin stífingarefni var ad finna í föndurbúdunum hér í kaupmannahöfn, en vatnid og sykurinn virkadi bara mjög vel og kúlan mín er enntá í fínu formi. 
Ég notadi svo perustædid sem var innan í jólastjörnunni og get tá bara skipts á ad nota hekludu kúluna mína og jólastjörnuna á jólunum. 
........................
I had gotten a lot of fine yarn and small crochet hooks from my great grandma, so I decided to try it out and make the light with some of the fine yarn. In one week i finished the light, and I used Water/sugar solution to stiffen it. 

Kúluna hekladi ég, úr fínu garni, med fínni heklunál, bara út í loftid og fór ekki eftir nenni uppskrift frekar en vanalega. Ég lagdi stykkid svo í sykur-vatns bleyti kreisti vel úr og blés svo upp blödru innan í kúluna. Tannig hékk hún uppi í 2-3 daga tar til hún hardnadi alveg. 
Tá gat ég sprengt blödruna og fjarlægt hana varlega úr og fest perustædid innan í og hengt kúluljósid mitt upp. 
............................
I used the sugar water solution to wet the piece, then i blew up a balloon inside the piece and let it dry for 2-3 days, until it was completely dry and stiff, so I could cut a hole in to the balloon and remove it. Then I just attached the light bulb socket. 
Hér sést hvad tad kemur falleg birta út frá ljósinu, en tad átti eftir ad fela snúruna. 

Nú er ég líka búin ad prófa ad setja glæra seríu innan í, og finnst mér tad líka koma ótrúlega vel út. 
.................................
I also tried to put some clear christmas lights into it and i think it looks great too. 

Tuesday, February 16, 2016

Skapadu þína eigin hamingju- Create your own happiness


Ég fékk heimsókn frá mömmu og Kötlu frænku nýlega, en tær ásamt pabba og Tótu, kærustu Kötlu reka verslunina Systur og Makar, sem er á Laugaveginum og á Akureyri. Mamma gerdi nýlega plagat sem ég vard svo ótrúlega hrifin af, en ég bad hana ad taka eitt med hingad út til mín, svo ég gæti fegrad adeins upp á stofuna mína. En hún var ordin heldur tómleg eftir ad blessad jólaskrautid fór í kassa. 
.............................................
I got a visit from my mom and her sister, but they and their partners own a store called Systur og makar. They have to stores in Iceland and a web-store. My mom designed this poster, and I asked her to take one with her for me, because I wanted to decorate my living room. It felt kind of empty after I took all the Christmas decorations down.  


Myndin/plagat er 50 cm x 70 cm og fæst hjá Systur og Makar.
Rammi/frame : Ikea (GUNNABO)
Plöntur og vasar/plants: Ikea
Kertastjakar/candleholders: Urban Outfitters
Strútsfjödrina keypti ég í ótrúlega skemmtilegri búd hér í Køben, sem selur allt í hattagerd. 
The feather is from a beautiful hat accessory store here in Copenhagen.
Fyrir myndin. 
Ég er alls ekki hrifin af tessari gluggakistu, en mér finnst gráu ristarnar verstar af öllu. Ég veit ekki hvernig ég get "falid" tetta án tess ad loka fyrir en ég mun finna lausn og skrifa tá kannski líka færslu um tad. 
......................
This is the before picture. 
I really love the change and the poster is so beautiful. 

Thursday, February 4, 2016

Síd lopapeysa med fléttu/snúning - Long wool sweater with a twist


Nú get ég loksins byrjad ad skrifa adeins aftur, og vonandi kemst allt saman aftur á strik, eftir smá pásu. Ég er búin í prófum í bili og komin í smá frí svo ég get nú farid ad dunda vid ad gera íbúdina fína og prjóna eda hekla meira. Mig langadi ad deila med ykkur peysu sem ég var ad prjóna en hún er eftir norskri uppskrift, og heitir Jakke med tvist. Tetta er mjög plain peysa og passar tví vel vid allt, en ég elska einfalda detailinn, fléttuna í bakinu, sem gerir peysuna pínu adsnidna og ödruvísi. 
Ég prjónadi peysuna á hringprjón nr. 7 og notadi í hana einfaldan plötulopa og mohair ullarblönduna Stella frá Järbo. Peysan vard tví vodalega mjúk en líka mjög hlý og svo er hún tunn og létt svo tad er gott ad skella henni yfir sig í vetrarkuldanum.
Mér fannst tessi blanda af garni passa vel vid uppskriftina, tó svo ad annad sé gefid upp í upprunalegu uppskriftinni, en ég var med svipada prjónafestu og adlagadi peysuna eftir törfum.
Tetta er í fyrsta sinn sem tad heppnast hjá mér ad prjóna opna lopapeysu, en ég hef aldrei prófad ad prjóna peysu fram og til baka. Tad var audveldara en ég hélt en tessi peysa er mjög skemmtileg og audveld ad prjóna :)

.....................

I am finally done with my exams, so now i have a little free time to concentrate on my apartment and knitting the next few days. I wanted to share with you a sweater that I knitted recently after Norwegian knitting recipe, Jakke med tvist. This sweater is really plain and simple, so it fits well with almost everything, but i LOVE the little detail in the back, the twist, that makes the sweater a bit more fitted in the waist and makes it different from the basic cardigan.  
I knitted the sweater on knitting needles nr. 7 and used a circular knitting needle. I used Icelandic wool, single thread of Plötulopi (Unspun yarn, 100% new wool.)  combined with mohair wool blend from Jarbo- Stella. This made the sweater both really soft and comfy, but at the same time it is warm, and also light, so it is nice and comfy to wear in the wintertime. This combination of yarns fitted perfectly for this recipe although it was not the same yarn as used in the original recipe. It was my first time making an open sweater and knitting back and forth, but it was much easier and more fun than i had imagined.


Eins og ég hef ádur skrifad, tá er ég algjör Pinterest fíkill, og fæ ósjaldan innblástur ad mínum verkefnum tadan. Mig langar til ad deila nokkrum myndum med ykkur af fallegum sídum gollum, en tær hafa verid mjög vinsælar sídan haustid 2014. En falleg og hlý prjónud peysa getur passad med mörgum outfittum og mun sennilega alltaf fitta inn í haust/vetrar tískuna. 

...................

As I have mentioned before, I am a huge Pinterest fan, and I often get inspired there for my projects. I wanted to share with you some of my inspirational pictures of beautiful long cardigans, but they became a trend in autumn 2014. A beautiful, warm and cozy sweater fits with many outfits and will always be IN for the autumn/winter fashion.  
Long Cardigans:
Zara Black Peep Toe Lace Up Ankle Heels Discover and share your fashion ideas on https://www.popmiss.com:
33 Trendy Street Style Winter Outfits:
ASOS Longline Waterfall Cardigan in Brushed Knit:
That long sweater tho:
cozy: